Getting Started with the API
The LifeOmic API is a standard REST API, and many of the concepts and operations will be familiar to developers. This guide will help you get what you need to get started. These basic steps include:
These procedures require a LifeOmic Account. If you do not have an account, Contact LifeOmic to be set up with a developer account.
Create an API Key
The easiest path to authenticate with the LifeOmic Platform API is to create an API key with the LifeOmic Platform web app.
Complete the Set up API Keys procedure and copy the key value in a secure location. The API key has the ABAC privileges of the user that created it.
Set the Authorization Header
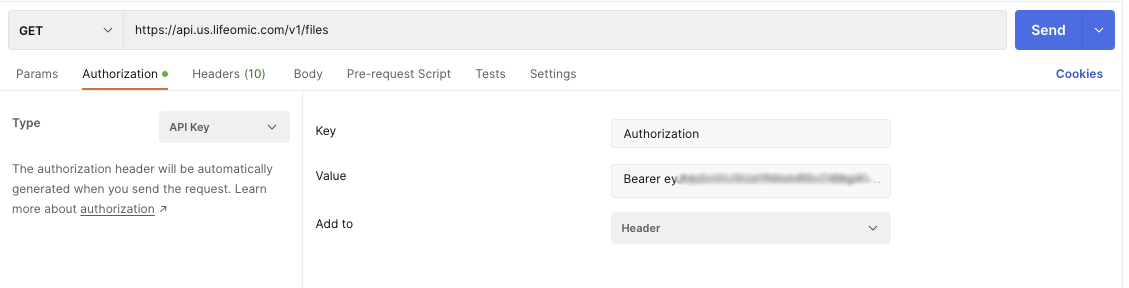
Use the HTTP Authorization header and set the value format as: Authorization=Bearer <api key>.
The LifeOmic Platform uses OAuth 2.0 authentication. It is important to include Bearer to designate the OAuth 2.0 bearer token implementation.
API Key Example in Postman
Here is the API key set up in the Authorization tab of the Postman API tool.
API Key Example in cURL
This cURL example shows the API Key.
curl --location 'https://api.us.lifeomic.com/v1/files' \
--header 'LifeOmic-Account: <account-id>' \
--header 'Accept: application/json' \
--header 'Authorization: Bearer <api-key>'
Find Your Account ID
A LifeOmic account is the umbrella for a customer relationship, for example, a health organization. The LifeOmic account contains projects that define the datasets for the customer.
You will need your LifeOmic-Account <account-id> to make a valid API call. To find your account-id:
- From any page in the LifeOmic Platform web app, click the logo at the top of the page.
- From the home page, click the Account Info tile.
- Copy the value from the Account ID field.
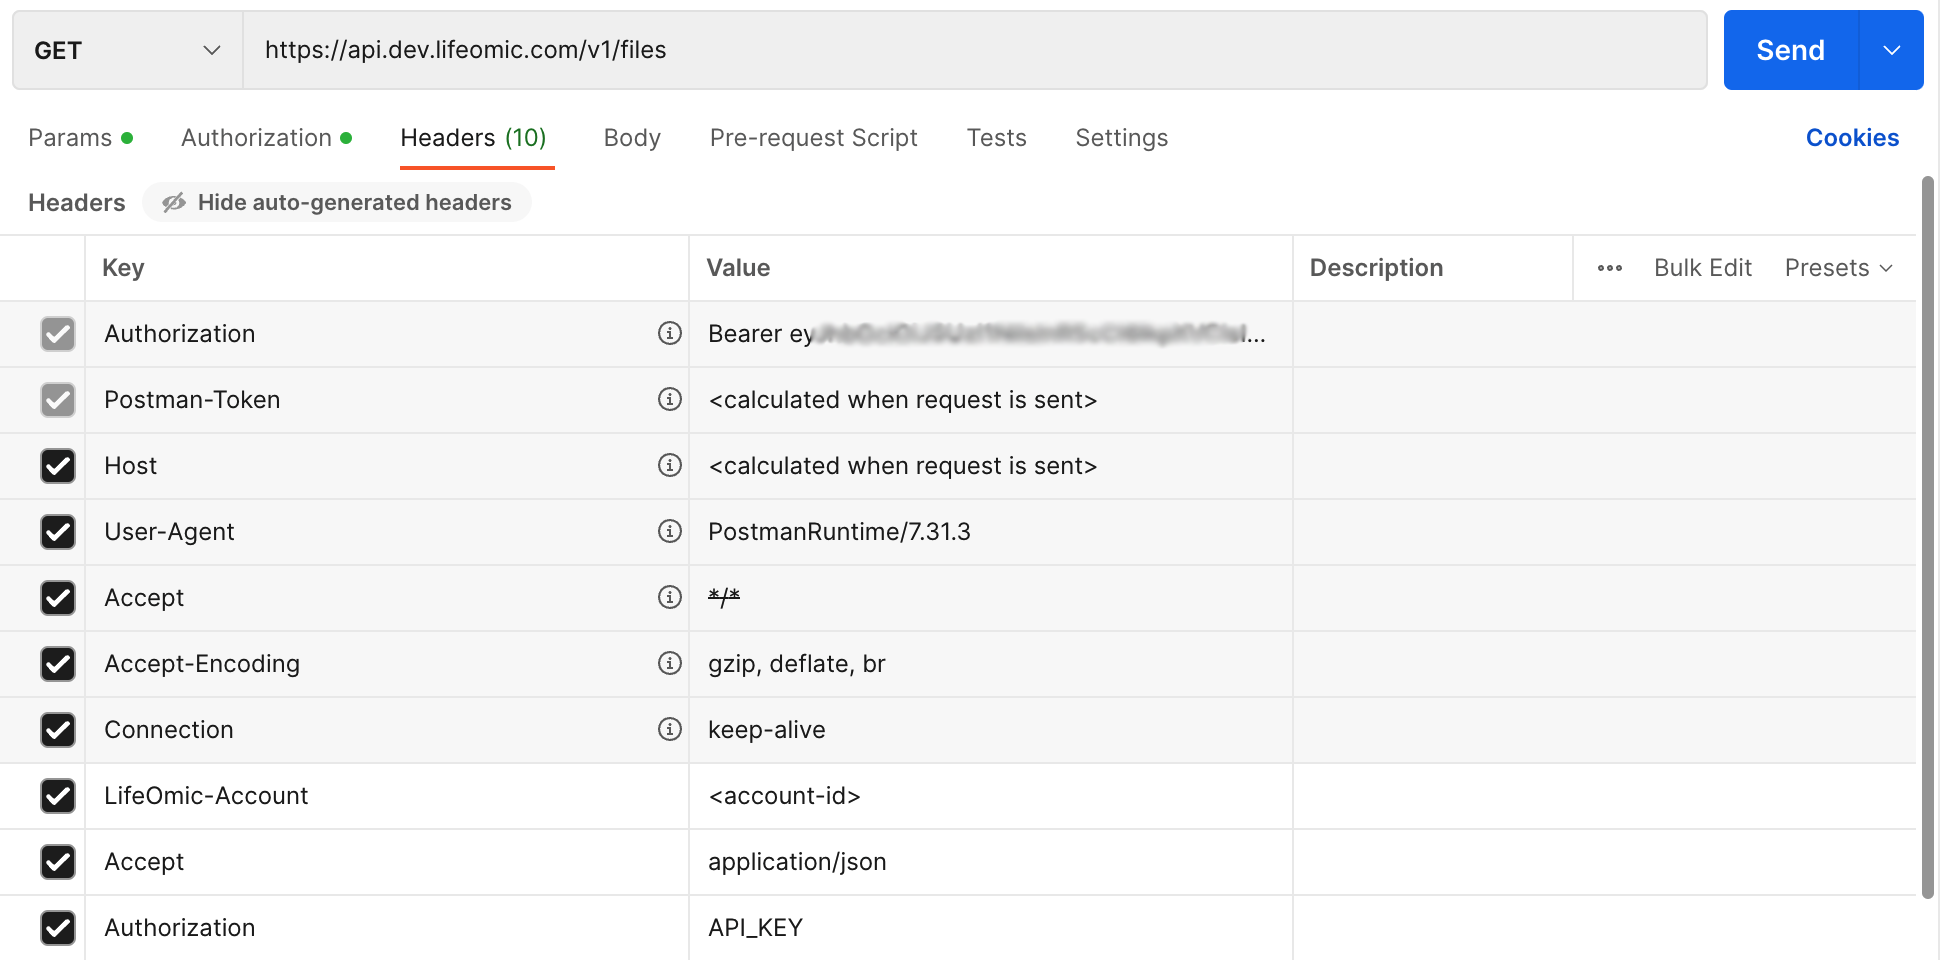
Account ID Example in Postman
Here is the Account ID set up in the Headers tab of the Postman API tool.
Account ID Example in cURL
This cURL example shows the Account ID.
curl --location 'https://api.us.lifeomic.com/v1/files' \
--header 'LifeOmic-Account: <account-id>' \
--header 'Accept: application/json' \
--header 'Authorization: Bearer <api-key>'
Find Your Project ID
A project is the core dataset used by the LifeOmic Platform. It can be a grouping of subjects or patients or med devices. It is the most useful way to define your API calls. For more information, see projects.
The parameter datasetId in a LifeOmic Platform API call specifies a project identifier and requires a unique <project-id>. You can find it with either the web app or an API call.
Find Your Project ID with the Web App
- From the LifeOmic Platform web app, click the Home tab on the left side panel.
- If you are not already in your desired project, click the navigation above the Home tab and select it.
- From the browser URL, copy the 32-digit-string after
projects/. For example,https://lifeomic.apps.us.lifeomic.com/phc/project/projects/ebe1618f-e474-4947-a6d2-18b19fac663a
Find Your Project ID with the Projects API Call
GET https://api.us.lifeomic.com/v1/projects is the API call to list the project IDs for your LifeOmic account. The project ID and the datasetID are the same value and used interchangeably in the LifeOmic API.
Datasets Call Example
This cURL example shows the datasets call.
curl --location 'https://api.us.lifeomic.com/v1/projects' \
--header 'LifeOmic-Account: <account-id>' \
--header 'Accept: application/json' \
--header 'Authorization: Bearer <api-key>'
Response to Projects API Call
The <project-id> value is listed in the JSON response after the "id" key. Copy the 32-digit-string.
{
    "items": [
        {
            "id": "a657f43d-385e-4b7b-a588-a24d923e3f99",
            "name": "Genome Project",
            "genomeBuild": "GRCh37",
            "description": "Human Genomes Project",
            "owner": "john.smith@company.com",
            "auditLogging": true,
            "versioning": true,
            "lrn": "lrn:xyz:xyz:xyz:project:a657f43d-385e-4b7b-a588-a24d923e3f99",
            "mrnConfig": {
                "configType": "typeCoding",
                "system": "http://hl7.org/fhir/v2/0203",
                "code": "MR"
            },
            "engagementConfig": {
                "demographics": {
                    "hiddenFields": [],
                    "requiredFields": [
                        "subjectId"
                    ],
                    "intlPhoneNumberFormat": "none"
                }
            }
        },
 ....
    ],
    "links": {
        "self": "/v1/datasets"
    }
}
Next Steps
Now that you have what you need to work with the API, let's try some basic operations with the File Service.